Showing posts with label wrap dress. Show all posts

Autumn sewing starts... Ultimate Wrap Dress

Friday, 3 October 2014


Ahhh Summer...

It feels like it was a million years ago now! This photo was from the Sew Over It Summer party, where we all had a great night making lampshades (which are awesome, and mine has been in use ever since!).

On the night, I finally got my hands on the pattern I had been lust after for quite a while - the Ultimate Wrap Dress (which can also be taken as a class). Although I also spent most of the night lusting after Lisa's Doris dress (that's Lisa in the grey on the far right - as if you didn't know!).

It didn't take me long to get to tracing this pattern, and it was one of those makes that just flowed out of me, with no major issues or unpicking. I had the bulk of it sewn up in the last hour of sewing club!


The fabric is a Black/Grey animal print knit I bought quite a while ago from Minerva Crafts. I think it's a heavy jersey or ponte. It's very stable, and was a dream to sew with!


I wouldn't normally wear something like this without tights at this time of the year, but I felt they were obscuring the dress for photos! I've been wearing the dress with black tights and heeled lace-up ankle boots. Which I wish I had taken at least one photo of, because they are awesome boots. Next time!


It fits perfectly around the bust line, but I like to keep my cleavage covered, so I've popped a plain black cami underneath for modesty. There would be a lo of bewbage otherwise!


I'm seriously trying to remember what adjustments I made before I started. I'm pretty sure I tried to get the most out of using a stretch fabric but making it all pretty simple. For the front pieces I cut a 14 for my bust. I was going to grade it in at the waist, but decided instead to take the excess width away from the under and over wrap edge instead. I thought this would ensure that it wasn't too big at the under wrap - the worst would be if I couldn't pull in for a snug fit. I cut the back as a 14 bust/12 waist.


I could probably afford to add a little more on the underlap with no issues, but I think it's pretty good! It's a comfortable fit, and as I said - the bust fits well. I could probably lengthen it a smidge, I think I traced a piece off wrong because the front pieces turned up shorter than the back- so of course I ended up a little shorter than I meant to be. I'll check my pieces before the next try.


I was warned the ties are pretty long. I stupidly didn't cut them on the fold, so mine are pieced at the centre and therefore slightly shorter. I tend not to knot them, or even double knot, as the ponte is a bit thick and it stands off my body a bit bonkers. The fabric has enough grip to not unravel so I'm safe! If I was making it in a ponte again, I might consider making the ties marginally thinner.


I'm sure I must have shortened the sleeves, but I love having sleeves that finish where I like them for once in my life! It's awfully exciting. The only tricky sewing bit was sewing the curved front edges of the hem. I took it nice and slow with my machine's triple stitch. One went fine, but one was a bit more difficult for me! They were coming out a bit wavy, but with a good steam they flattened right out!


I used the facing pieces included in the pattern. I was going to give bias binding a go as an interior finish but I didn't have any premade stretch binding (and I was too lazy to make some!). I decided that the facings would probably stay put okay with this thicker fabric, and I also topstitched 1cm from the from edge to keep it in place. I used the triple stitch again here.


The only mistake I made sewing up the pattern was the placing of the wrap ties. They really need to be in the perfect position for the turn out. I didn't really consider perfecting the placement before I had my first crack at it and ended up with the seam ripper!


My tip would be to ensure you have measured down 1.5cm from the top edge of the wrap, and ensure you're not sewing into the wrap tie before you pivot the corner. Because if you do, your tie will be all sorts of buckled at the top. Oh yes! I did consider this before I did it but I didn't listen to my instincts!


All in all, I'm really happy with how it turned out overall, and my Mum loved it too. Although you wouldn't have thought it with the face she made at me when she realised I had made it. Sometimes she's so impressed, she's disgusted, haha!

This is the beginning of my comfy day dresses, and it's working out well so far. There will be many more of these popping out! Has anyone else fallen into Autumn sewing yet??

Emmie xx
Vintage Guts part 1

Saturday, 28 June 2014


Hey Guys!

I bring to you the first installment of my Vintage Guts series!

I'm excited - I hope you are!

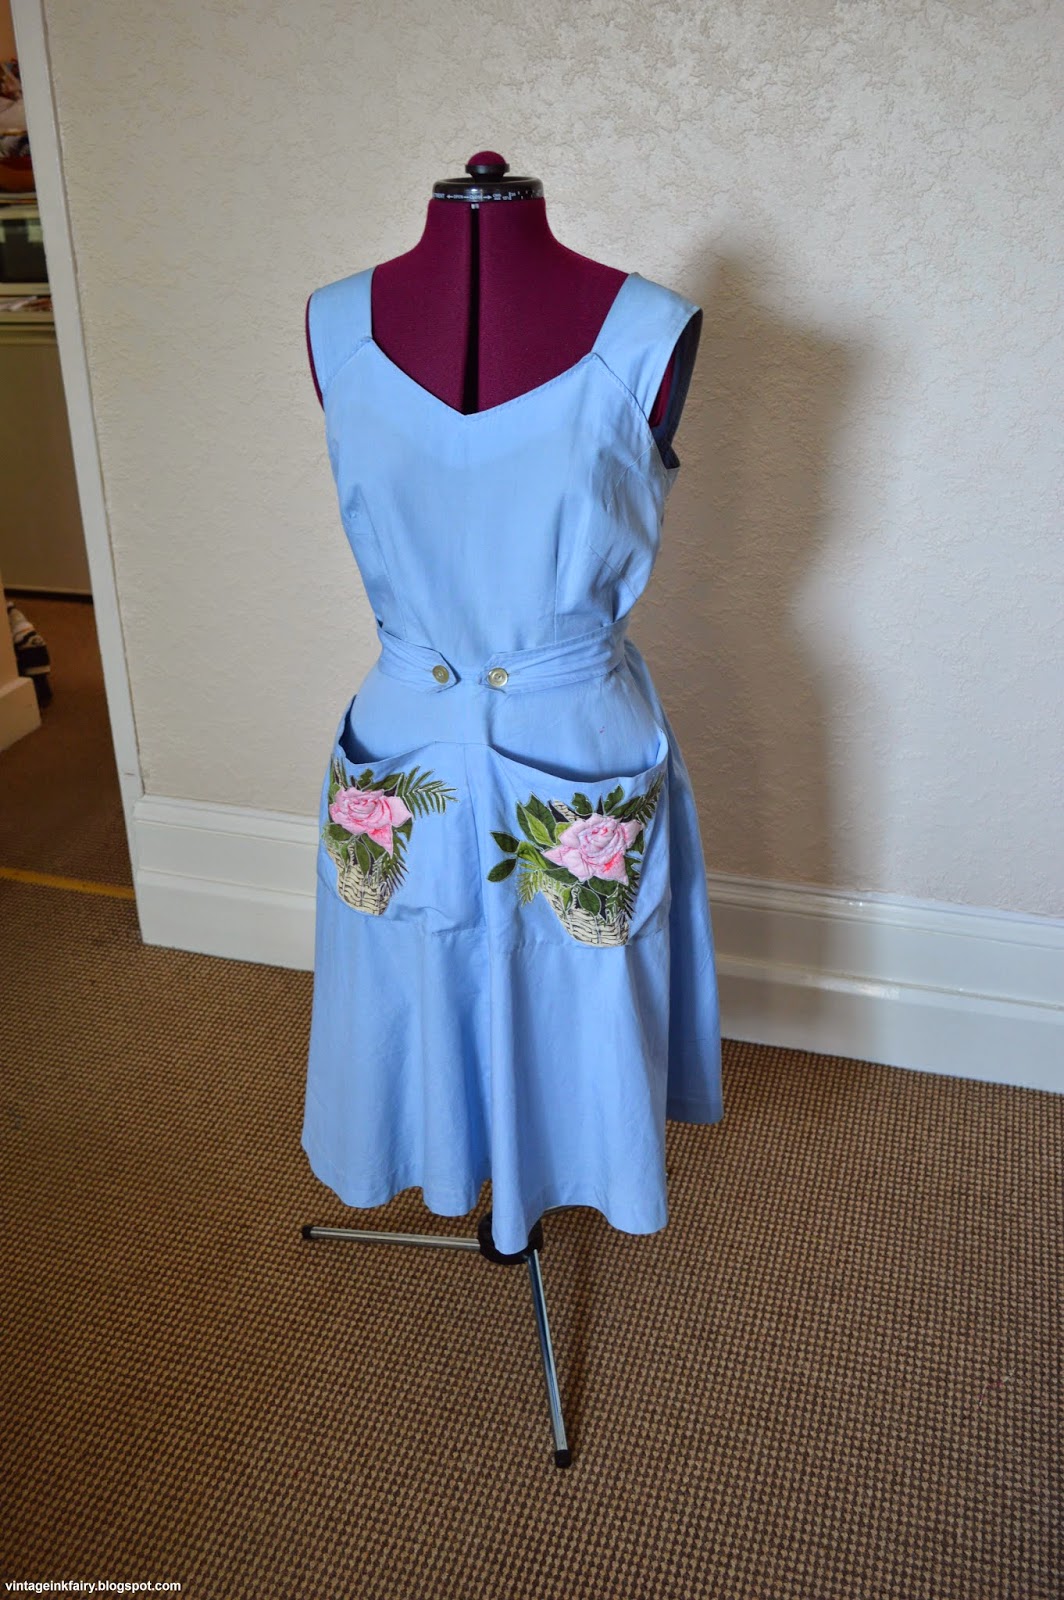
So the first dress I'm bringing you is my blue Wrap Dress. I bought it in April in a shop called Retro Fit in San Francisco. The shop I bought it in was really awesome, the best part being that the changing room had a submarine door to climb through.
It appears to be made of a chambray, and I think it cost me $103 with tax.

 There was another dress I liked too, but the lining was shredding and I thought it would need to much work. Also, Mr.G was all 'you don't have much room in your case and you don't know what else you're going to find'. To be honest, that was true, it was our first day. But it was super cheap because of the repairs needed.


So as you can see, the dress kind of has a dungarees feel about the straps. The wrap-ties button at the front, and there are MASSIVE pockets on the front, with appliqued rose baskets. These pockets are amazing, they hold so muc, and even better, half the time you can't tell there's anything in them.


It looks to me like the rose baskets are all one print - cut out of a print in one piece, and then appliqued around each piece to make it like like patchwork. The roses are quilted, and puffy with wadding.

The pockets are edgestitched at the top centre front. And for some reason asymmetrically.
Which is probably why the pockets sit differently sometimes. I might rectify it, as it bugs me sometimes.


A I mentioned, the wrap-ties button at the front.


And there are two sets of buttons for, you know, if you've had a big dinner.. I like how you can't tell the second set are there! From doing this post I have realised that the placement of the buttons on either side and centre front of the skirt in relation to the darts, is completely off.


There are three darts shaping the bust, which I definitely appreciate! Gives less of a boxy pointed bust, and I enjoy the fact that one of the darts goes into the arm.


The straps have a dungaree feel about them. The whole neckline is faced, and the staps are just topstitched on. The straps travel down the wrap back into the waist, and enclose the side backs in the process. It is topstitched all over.


The back skirt seams utilise the selvedge. The selvedge of this chambray is basically the exact same as the rest, which is awesome, and it isn't obviously the selvedge, but you get that finished edge with no fraying!

The outer wrap has folded in the selvedge by about two inches, and it is simply pressed, but the inner wrap isn't folded at all!


The under wrap comes through the side seam, where a gap has been left, and topstitched around. 


Now going inside out...

The company brand label is still intact! It looks like they trademarked at the end of 1959, so the dress is Early 60s probably.


As you can see, the straps enclose the side back on the inside too! the waist is pinked and topstitched up. You can see the selvedge edge of the skirt.


I love how the dress looks almost the same inside out.


The hem has a small turn and then a deep one, and is handstitched. It's a little uneven but hardly visible from the outside.


Some of the seams are pressed oped in parts and some aren't. The skirt sides are pressed open for the waist seam but pressed to the side at the hem. The bodice sides are a little erratic too!


As you can see theres a small red mark in the fabric at the waist front which was pointed out to me when I bought it. I had already seen it, but I couldn't leave it behind.


The front neckline is faced, understitched and topstitched. The edge of the neckline is turned under and stitch, although a small bit needs to be repaired. The centre front of the facing V is seamed.

You can see the edges of the straps are turned in and topstitched.


I think one of my favourite parts of the dress is how the straps enclose so many seams. If I want to replicate the dress, I will really need to think about the order of construction!


I don't think there's anything left to cover in this one!

Hope you guys enjoyed it, and if you notice anything that I haven't - let me know!!

Emmie xx
Made With Love By The Dutch Lady Designs