Showing posts with label GBSB. Show all posts

Apron's for all!

Monday, 11 August 2014


Hey Guys, 

So, in all of my faffing about, I did actually finish something. Who would've thought it.
It was my Dad's birthday when I was at home there a couple of weeks ago, and I decided that maybe my Dad should have something made by me - seen as I've made things for my Mam and sister (although, those bags I made for Christmas are basically worn to death at this stage - nice to know they got good use, but not a great advertisement of my skills!)

So while wracking my brains, I thought - why don't we be sensible and make him something that he will get good use of? And seen as my Dad is a chef, I thought there would be nothing better than a good old Chef's Apron - or Butcher's Apron as the case may be.

And I'm sorry, but it turned out f**king awesome.
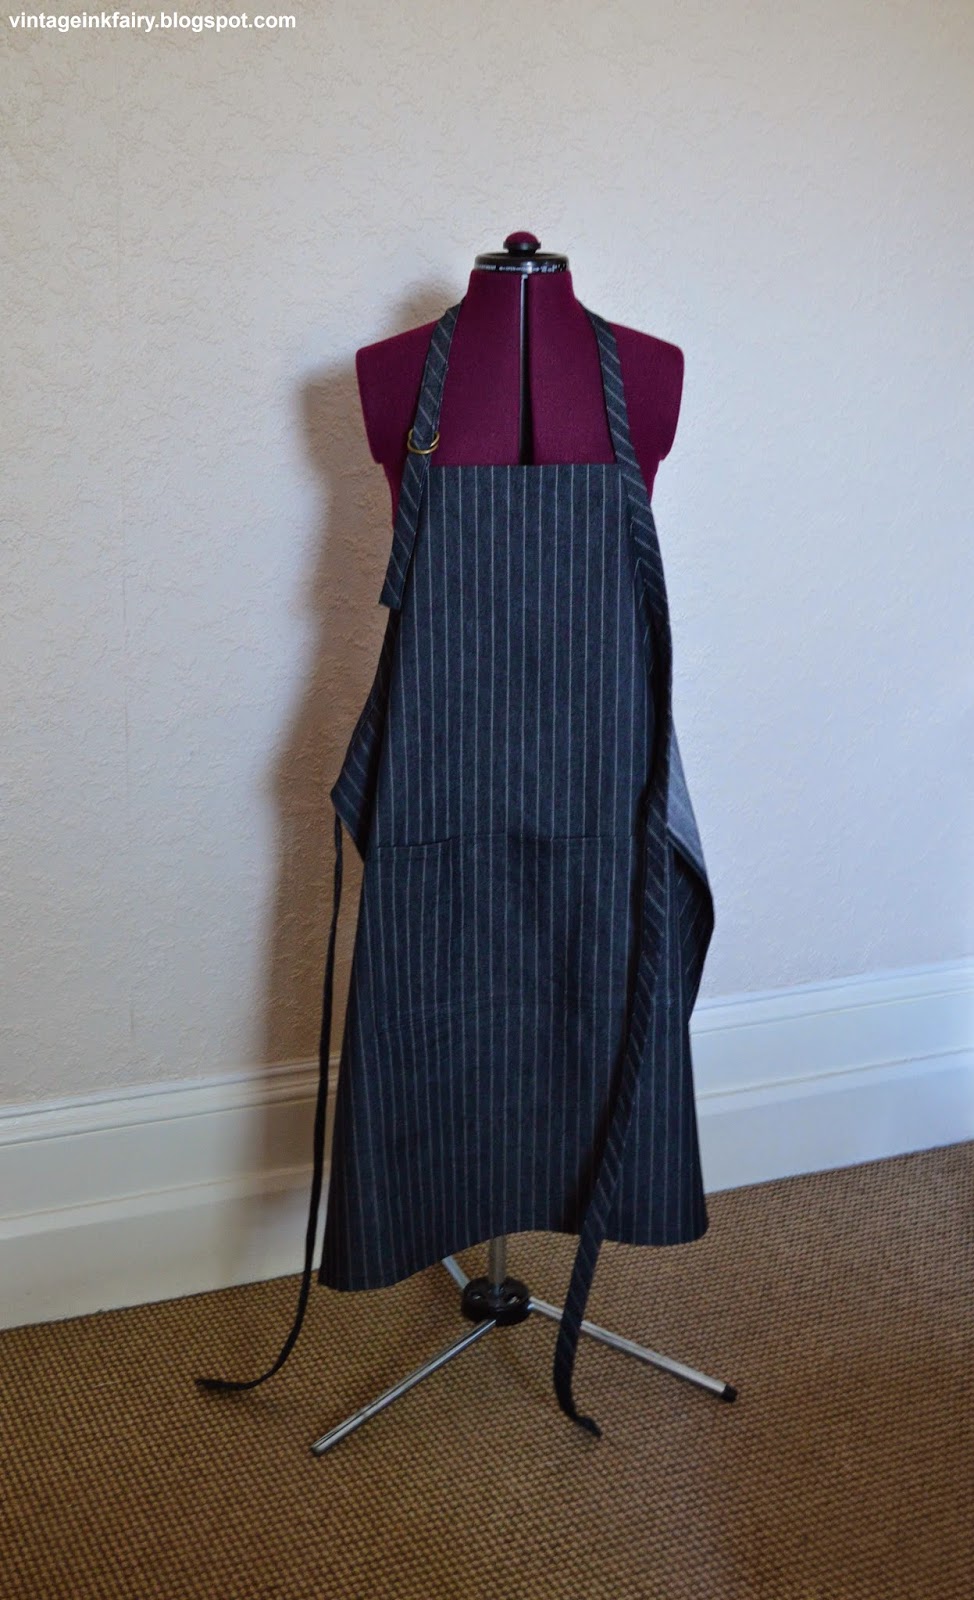

I used the Butcher's Apron pattern from the first Great British Sewing Bee book. The pattern doesn't look too inspiring but it turns out a damn fine apron.


I made the apron from some pinstriped denim I had stashed from our sewing club. The place that we used to hold our club in was shutting down, and they had been donated a bolt of it from the local fashion college so I got myself about 1.5m of it. I think Rachel got some too, and a lady that does upholstering took the rest.


I'm super glad I did, although I don't know why I took it as I don't think I would've worn it! I have a habit of stashing free stuff for the sake of it. I'm a out and out hoarder.


It was the extra details I put into the apron that made me really happy. I made the bias binding from the denim and I made sure to match all the stripes, which looked great :) 

The only thing I wish I had done was to make opposing bias binding for either side of the neckline. As it is, the stripes run in a continuous line, when they may have looked better mirrored. Oh well, no harm, no foul!


I bought some lovely D-Rings on eBay to really give it that extra pizazz, and they are really good quality and have a great weight to them. To be honest, I chose the eBay seller that gave free 1st class delivery (how does anyone make money doing this??) as I was kind of down to the wire with this - of course.

In my defense, I thought I had the rings but they turned out to be far too big.


I also took really good care to ensure the stripes were running straight up and down, and that the hemming was even. It's the little things that really show up in a simple make like this!


I also added a lovely big pocket, and on Mr.G's instruction, I ensured that it was low enough to suit sticking your hands in at their full extension. And believe you me, that is actually important.

I also ran a line of stitching up and down either side of the centre pinstripe. It works so much better as a double pocket. And of course, stripe matching to the point that the pocket is damn-near invisible.


I edgestitched all around the bias-binding to secure it onto the apron. It runs all along the sides of the apron to form both the ties and the neck of the apron. I think this is what makes it a Butcher's apron possibly?

I didn't clip any curves, I just eased the bias-binding around the curve and stitched both sides together.


Just popped a scissors in to show the pocket! Nice and deep!


The strangest thing about the apron, is how it feel's when you put it on. It looks nice and all, but when you put it on, you don't want to take it off! It's happened to everyone that has put it on!


My only concern about the apron when it was finished, was that the neckline seemed really low, even when pulled to it's tightest. But the first thing my Dad said was that the neckline was good! Apparently it shouldn't be too high, you get awful hot in a kitchen if the neckline is too high. And I guess for the most part you're trying to protect your waist and lower parts from hot spills as well as general foodie grime.


He wore it to work that very evening! And apparently he got lots of compliments, and the other chef even said it was very professional looking. 

And I think I now have orders for my bro and Mr.G too. 

And I think they would also make a pretty awesome sewing apron, a la our aprons at the Sewing Bee :)

Well there you have it. One Chef's apron.

Maybe someday soon you may see the things that have been waiting to get up here since like June.
Since when did I fall so behind??

LYLT,

Emmie xx

Frankenstein Pencil Dress!! Vogue V8789 and "Great British Sewing Bee" Pencil Skirt Patterns

Sunday, 7 July 2013


This dress has been a long time coming dudes!

The dress is a Mash-Up of Vogue V8789 (view B) and the "Great British Sewing Bee" book's Pencil Skirt patterns


I decided I had wanted to try my hand at my first Full Bust Adjustment, as I do indeed have a full bust. Patternwise, my high bust is a 12 and my bust a 16 so I chose the V8789 pattern as the bodice had clean simple lines, and a horizontal and vertical dart, which is what I was most familiar with adjusting. I realised when I started that the bodice was supposed to have buttons and loops at the shoulders, with neck facings, but I fore-went that, and did a regular shoulder and full lining. 

I did the FBA as I had been shown in my classes (Thanks CL!). As in the class I ended up with the darts being quite large. I did about 1" of an adjustment (I suppose thats 2" in total), but when I looked back, we had only done 3/4" in class. I could've probably got away with 3/4" actually, but the extra doesn't do me any harm. 
I love a good deep breath. 
I did sew this bodice up, but once it was done, I was worried it was giving me square boob. I have a haphazard pic I took of it pinned to my dressform. 


So I decided to go back and put in a third dart, a french one, as that's what we chose to do in the class and it gave some nice shaping. I pulled out my shift dress pattern to lay in front of me so I could ensure I was doing it right. This pic is a before and after - (but they're laid out after and before!). For safety I decided to recut the bodice as I had loads of fabric.


I used a Houndstooth wool(ish) fabric I got in Walthamstow for about £1.50/m if I remember correctly. Thankfully it pressed fine and didn't melt or anything, although the thread I used sizzled when I put the iron on it first. Must have been pure polyester or something. Thankfully I was just the ends but they did melt to my iron and I had to scrape them off!
I did have some issues transferring the markings, so I pinned the fabric and pattern down on my corkboard, pulled the pattern off and used chalk pencils to draw the darts between the pins. 


I always like to make things difficult for myself. 
Note to self. Buy more plain fabrics.

I used a beautiful mauve poly-satin for the lining. I love the colour, and wish I'd bought more. It was £2.75/m on Goldhawk Rd. I went back, but they don't have this colour anymore. Sad Face.


I attached the lining to the skirt and bodice separately and then put the two halves together. 
I matched up at the side seams, and the bodice ended up a little big for the skirt front, and the the skirt was far too big for the bodice back. Wonderful.

For the front, I deepened the vertical darts slightly, for the back, I hacked off the extra. 
Houndstooth is good for this, I just followed the squares! 

I  topstitched around the armsholes and the back neck, but I left the front neckline free as I wanted it to look seamless. Unfortunately, somehow the neckline was sooooo high, it would've been choking me. It also would have looked completely ridiculous. I got my french curve and drew a haphazard new neckline on the inside and hacked off the excess. 
I thought it was going to be a disaster, but the sewing gods were looking down upon me, and somehow - SOMEHOW - it ended up perfectly even and even seems to flow along the houndstooths. God only knows how that happened, as I am not exaggerating the haphazardness.

I did an invisible zip, and got really anal about it, as I couldn't get close enough and it kept gaping. So I repeated my (pre-concealed zipper foot) trick of holding the zip coil open with the presser foot clamp, and going down stitch by stitch, aiming the right place, and moving the needle with the wheel.

That was fine and dandy on the side where the feed dogs moved it along. A little harder work on the side where the feed dogs wouldn't move it along, and I also had to move the fabric along by hand inbetween stitches. I swear it works really well overall!

I was worried about the dress being too snug, so I only did a 1cm seam allowance on the back.


I avoided sewing in the linings for a bit, as I couldn't face it. Its one of those things I hate the thought of until I start and then I find it really therapeutic. Also helps if you put it on the dressform and watch Criminal minds at the same time. By this point I'm not feeling too accurate and I kind of just wing it, and fold up bit by bit without measuring. I do make sure I don't pull too tight, and it's roomy, but still. Naughty.


I normally do a narrow hem, but I usually work with light cottons! I decided to try a bias bound hem, as I was worried about the "wool" being too bulky double-folded. Happily  it was beautifully neat. My best ever stitching and no one can see inside! I took pics for proof though. Thankfully most of the stitching is running through the black squares on the right side so it's almost invisible. 


Smack bang in that crease. 

To be honest. Up until finishing, I wasn't loving this dress. 
I was worried the bust apex was too low, I couldn't press out the darts how I wanted, I took ages to get through it, but once it was done - Hot Damn!! (in the words of Miss Demeanour)


I love it


I wore it to London yesterday to meet The Spoolettes and I was comfy all day. The waist is nice and fitted, but just enough room, the neck is comfy and the length is just right, and that was a complete fluke. 
Clearly I need to wear a bra with thinner straps though! lol


Not the best pics, I'm not exactly standing straight!!
But at least I'm looking really really happy. The Spoolettes will have that effect on you.

Thanks everyone for the encouragement to finish it! It was definitely worth it.

What next?

xx

Time for Tilly's Mathilde Blouse!

Saturday, 1 June 2013

Hi everyone!

Just wanted to share my latest make with you all! It's another tester. 
I'm kind of calling them tester's because: 
(a) I have never done some of the skills required
(b) I'm using pretty cheap material to practice with
(c) I want to check the fit before I use nice fabric

But it is completely wearable!!
I do actually have nice fabric about to be dispatched for the real one.

I swear I'll make a non-tester one of these days! I'm trying to figure out what pattern to do next as I type and there is definite non tester fabric hanging on the clothes airer!

Sooo on with the make!


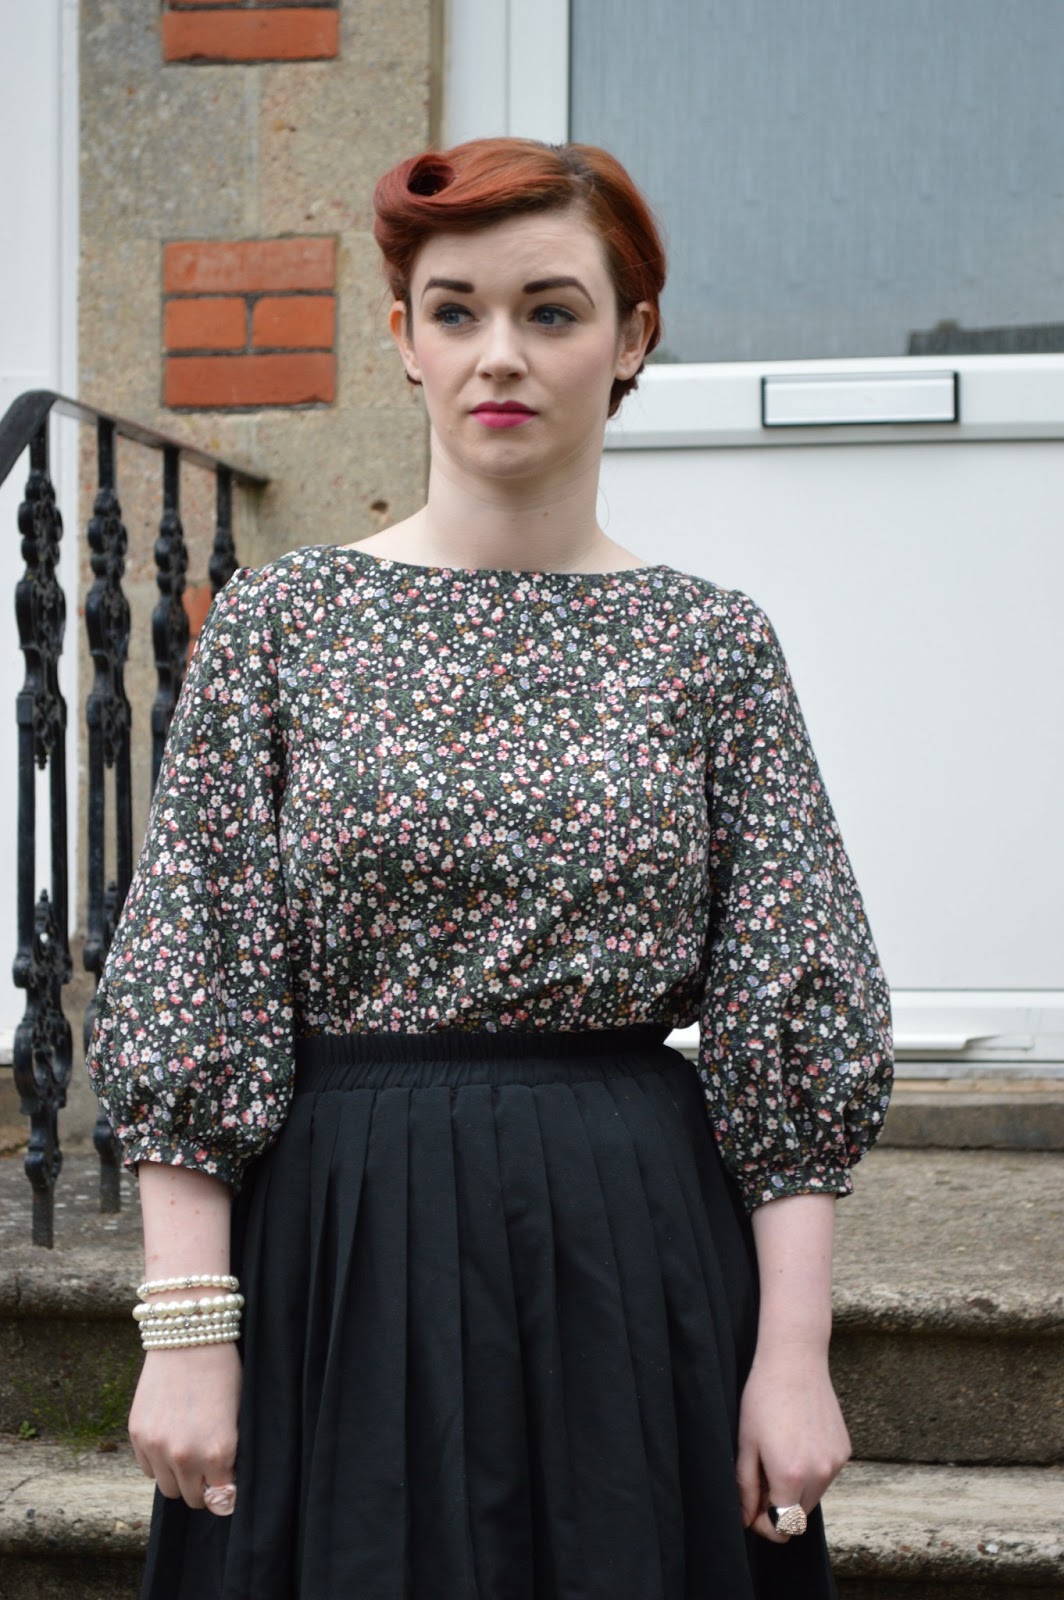
I was sewing Tilly's Mathilde Blouse, which I had been admiring from afar for ages! I thought it would be a good make for me because its a very clean shape and I would learn a lot from it, having never done a blouse, pin-tucks, buttons, buttonholes or sleeves!!

According to the sizing chart, I was a size five. I noted that the size 4 finished garment measurements would also cover my curves so I had a perusal of the maker's gallery and decided that I liked the slightly more fitted blouses, so I decided to bite the bullet and go on the smaller side. 

It took me a while to assemble the pdf pattern (I didn't realise how many pages there would be!). But once it was already to go, I did like how it was nice and stiff and not easily damaged like tissue patterns. 

Cutting out went fine, but I did get confused on the facings, etc, where it said 2+2 (which I now know means 2 fabric and 2 interfacing). I did however panic and cut out 4 fabric pieces initially (imagining some fancy facing with an enclosed seam - like a collar). 

Moving on from there, I had some initial problems doing the pin-tucks. Firstly I didn't look to see how they are formed and I did some completely incorrect pressing which had to be undone. Plus (ignoring Tilly's wise advice) I thought that I could get away with notches on the top and bottom of the tuck and forego the chalk marks.
This moves on to me abandoning the notches and remarking the entire blouse. Picture this happening quite a lot throughout this make. I like to skip ahead and then have to take 4 steps back. I also pinned each pintuck and pressed them before stitching

I'm also not sure as to whether you are supposed to see only the topstitching for the first pin-tuck or see all of them? I can see the first and then bits and pieces of the third - but blame that on my rushed chalkmarks.
I also decided to throw caution to the wind and use a contrast thread for the topstitching to bring out the coral in the fabric. The fabric I got for very cheap in Walthamstow, the buttons came in a green button mixed bag. I think the thread was from the London Meetup.


Everything went smoothly for a while after that, I even did some french seams (another new skill).

I had to do some research, and quite a bit of practice, before I figured out the buttonholes. Even when I decided I was ready, the first one went funny on me and I had to rip it out, which is surprisingly difficult.

Once I had finished the buttonholes I realised they were supposed to be on the other side of the back opening. Whoops. Clearly didn't read the sentence to the end. I did sort of also wing how big they should be and where the button should be placed. There was no real measuring involved, but I'm happy with how they turned out! I think I just need to stitch up the buttonholes a little bit, as one keeps trying to escape, as you can see in the photos. I also have realised I can get it on and off without opening them so i can stitch them as tight as I like.


Now I'm not the best gatherer, I just don't really have the knack. I have problems keeping it tight at either end, although I guess it should fade out into being straight at some point, or I could start the gathers earlier and finish later on the fabric. I think its okay but it could always be better. I also couldn't see when I was supposed to sew up the side seams, but when I was following the online instructions they were sewn up in the pictures when the sleeves went in so I did it just before that!


I'm pretty please with the blouse! I do think that the fabric was a little stiff to make it, a drapier one would definitely be nicer, as the sleeves stay quite puffy when my arms are relaxed!
I'm thinking I might even try it with a short sleeve (like Lauren's in the maker's gallery).
I think that with a plain fabric it will be such an easy item to mix in with my wardrobe. I have so many skirts that I never wear because I literally have only 2 tops that I like. 

Now to settle the age old battle. I like it tucked in, my boyfriend doesn't. 

Who wins??


It's not bad, I just like a bit of waist definition. 


I'll leave you with what is becoming my regular photoshoot outtakes:


I wasn't looking at anything, which is what makes the two faces funnier!

Till next time!

Emmie x


My Great British Sewing Bee Experience!

Friday, 19 April 2013


Hi Everyone,

I decided I'd write up a little post about my stint as a (pretend) contestant on the Great British Sewing Bee!

Once upon a time, and by that I mean last October, I was taking a sewing course with Claire-Louise Hardie (The Thrifty Stitcher). During the classes, she mentioned that she was working on a television show for the BBC, a sort of spin'off of the 'Great British Bake Off' as the 'behind the scene's' sewing adviser. I was clearly very interested, and asked loads of questions - but of course she had to keep most of it schtum until it was broadcast!

On my last day, the alterations class, she was needed on set so her wonderful friend Rosie Martin from DIYcouture came and taught the class instead. You should check out her wonderful sewing book! I'll post links at the bottom! Rosie was going to help her on set after class, and more people were needed so I tagged along :)

It was very cool to see the set, and all the producers and camera men trying to lay out and run through the first episode. First I was a stand in for a contestant ( I had Stuart's sewing station in episode one!) and I just adored the sewing desks that they had made - yes made, and the cutting stations (at the right cutting height!)

And I especially loved the haberdashery! As do you all I'm sure! I would've given anything to have had the freedom to have whatever I wanted from there...

I played a contestant in a few run through's of the opening scenes, and it's really cool to see how thing's got tweaked from the day before to the real thing. And thing's I thought were going to look a bit odd actually came across quite well on television!

I also adored their mannequins, they were a decent womanly size and had a little belly and a lower sitting bust and bum than you usually see!

While they moved onto more camera angles, etc, I then started cutting out the patterns for the A-Line skirt challenge. Due to the shape of the mannequins, they were slightly between sizes, so we had to grade them out slightly at the waist. I was so scared that I would cut one wrong and there would be a massive panic!

After about 4 patterns worth of cutting I was a bit googly eyed, and at this point it was a bit late (and the bf was waiting!) so I thanked Claire-Louise and said my goodbyes! It was quite late in the evening at this point, and they were supposed to have finished an hour or two before I left, but they clearly weren't going to be finished for a long while yet! I was gutted that I wouldn't see it all in action - Claire-Louise told me I could come back, but I think they started shooting at some ridiculous time in the morning so I never would've made it in on the train! Plus I'm quite glad it was all a surprise on screen. It was so hard to keep quiet about what I knew about the show in the run up to it, and keep my lovely pictures under wraps

Here's the few piccies of me in action, thanks CL :)


I can't wait to see the final episode on Tuesday!! I adore all of the contestants, and had been a fan of Tilly from before the show! Had been working my way up to sewing her Mathilde blouse. My favourite bit about the show is how happy all of the contestants are and how lovely they are to one another. It looks like a wonderful place to be, and emulates the feeling of the sewing community as a whole! Maybe next year, eh?

Lots of Love,

Emmie!

p.s

Rosie's DIYcouture Book

UK : http://www.amazon.co.uk/DIY-Couture-Create-Fashion-Collection/dp/1856697991/ref=sr_1_2?s=books&ie=UTF8&qid=1366386756&sr=1-2

USA : http://www.amazon.com/DIY-Couture-Create-Fashion-Collection/dp/1856697991/ref=sr_1_1?s=books&ie=UTF8&qid=1366386633&sr=1-1&keywords=diy+couture

Made With Love By The Dutch Lady Designs