Showing posts with label blog. Show all posts

Simple Sixties Style...

Friday, 1 November 2013


Hi Guys,


Just wanted to share this Autumnal shift dress with you!


It's not a new make - in fact, it was one of my first! It was actually made back before I started my blog, but it's been languishing in the back of my closet all Summer! I made it in the sewing classes I took, and looking back at it now, I'm still impressed with the quality of the make - CL at The Thrifty Stitcher keep at close eye on us!


I got the fabric on Goldhawk Rd (of course). It has a lovely weight to it, but it's a lint magnet. Nightmare! It also gets a bit of a shine of you press it to much, so I have to be careful. I lined it with a blue satin, which means that I have no problems wearing it with tights in the winter! We used this McCall's pattern - which looks horrendous, judging by the styling! But its a decent basic block. We were given the pattern, and CL had FBA'ed the pattern on tissue paper before we got there to save time (we were taught how to do it ourselves too). She even transferred my tweaked pattern onto pattern card for me at the end!


Unfortunately, the sixties isn't completely my style, the only way that I really like it is with a cute blouse underneath. The blouse I'm wearing is Jasper Conran (It's actually my interview blouse! and I may need it again soon - eep!). I've been considering shortening the sleeves on a few shirts to get the same look. It can't be to hard, can it?


#


One of the main reasons I feel uncomfortable in it, is the lack of fitting when you look at a side view. 
But I'm not always wandering around taking side photos, so I can usually forget about it! It is the concept of a shift dress - a loose fit. I'm just used to a fitted waistband under the bust.


Although, to be honest, I did actually pick the most flattering shot of what I took!

 There were vertical darts under the bust on the pattern, but I have a feeling we left them out as we had three bust darts already. One small issue I do need to fix is that the lining has started to poke out at the front. I don't know how it has happened, it's almost as if it has grown overnight. I think I'll just turn it up an inch and it'll be fine. Also, just so you know, this is the absolute shortest that I would wear a skirt/dress nowadays. I love a midi length ideally.


Anywho, I'm up to my eye's in cake and batter for a 'Alcoholic Afternoon Tea' Hen party that I'm hosting at my flat tomorrow. You should see the sitting room, it's so empty! I had to move loads of the sewing stuff out for it to be safe for people to be in. Hopefully no one steps on any pins!!!

LYLT,

Emmie xx

Late night sewing... Mae Blouse - Bluegingerdoll

Saturday, 12 October 2013


Hi Guys,

I finished the third attempt at my Mae blouse! Yes THIRD.
Let me take you on a journey...

The first attempt was with sewable tracing paper. 
I traced between the size that suited my "finished garment" measurements and the next size up, but it wouldn't even close. This surprised me, as I know the patterns are drafted for a D (I know I'm an E but I thought I was gonna be pretty close, I was wrong). I definitely needed some bust adjusting, I wasn't even been able to close it! 


So I decided to follow the sewalong, and do an FBA.
However it went a bit weird in the middle. Let me explain why.

In the sewalong, the first thing you do for an FBA is cut off the sleevey bit. Then you do the FBA and stick the shoulder back on.

Weirdness 1: In the sewalong (illustrated) pictures, it shows a straight edge where you trimmed off the sleeve, even after the FBA. But when you do an FBA you create a side Dart and it ends up kicking out at the side, it doesn't end up straight. I didn't know what to do so i just overlapped the sleeve over the kicked out bit and continued on

Weirdness 2: The side dart created is never mentioned again. I was at a loss as to whether to ignore its existence or sew it up. I thought it would be be baggy and weird if I ignored it, so I sewed it up and trued up the waist/hips. Although I kind of made a balls of measuring them (I forgot to remove the front darts when measuring)

Muslin 2 was done in a lilac cotton sateen lining, that I thought could possibly be wearable, until I cut too short a piece of fabric (although it was still workable) Then I realised that it had a really loose weave (pins were leaving massive holes) and that it was pulling like hell. No No No.

After sewing that up, it closed, but it was SNUG. And getting something to just close is not something to aim for! It was drag-line city.

So I halved the seam allowance and tried again. Close but no cigar.
I drew a whole new seam allowance on the pattern for the next try.

So that brings us to Muslin 3! I made it with something I got at a stash swap. (Thanks to whoever donated!). Not sure what it is, a slub silk or a wannabe slub silk. Either way, its a little stiff, so bear with me in terms of how it crumples instead of drapes. Part of the issue is that my skirt has a smaller waist than the blouse! It looks a lot shinier in these photos too... 

Now in photo one, I am becoming one with the fabric in terms of stiffness. What is with the arms? I look like a puppet on a string. However, let us admire the fact that I found something to match it in my wardrobe! A kilt I got in the Salvation Army. Talk about a 'Fall' Wardrobe, eh?


Although in this photo, I think it looks a little big, it looks better shortly!
I am pretty proud of my finishing. I surprised myself with the scalloped neckline, I thought that was going to be a lot harder. It turned out a lot better than I thought, although Thank God it did because any flaws would be really obvious in this fabric. I used my new overlocker (although it was threaded white, so the insides look a little silly) but I did hand catchstitch all of the hem and sleeve facings! And partially thanks to the stiffness, partially my mad 1.00am sewing skills and partially Mr.G's thread matching capabilities, I think its pretty damn good.


It's like the 1.00am sewing never happened... 
I haven't done the neckline facing. Yet. I'm still not sure if I want to, in case it's too obvious.

In a side note, you can see my crazy eye colour in that top photo!


After the first few photo's, I decided to loosen up and stop looking like such a grump grump.
However, apparently I must raise one eyebrow at all times.


One modification I made to the back was to do the buttonholes vertical instead on horizontal, as I didn't like  the thought of how the buttons would drag off to one side instead of being central in the buttonhole.


I wish that the skirt waist wasn't so snug! Crumple crumple.

I would like to take this opportunity to categorically state that I sewed the buttons on straight and tight, but the buggers prefer to look tipsy, no matter how much I twiddle them. They are vintage buttons that I bought in a vintage shop in Rochester. Thanks for the recommendation Rachel!

All in all I found the pattern pretty straight forward, although I would definitely follow the sewalong, as I found the written/illustrated instructions hard to follow. 
It's probably just how my brain works, but I was stumped in a few places. The hem boggled me so I winged it in the end. I didn't end up doing the second turn either. Ironically I think I understand now, in this exact moment. The photo was the wrong way up for my brain.

But look, I'm still happy with how it turned out! Even my eyebrow agrees


Another version is already in the pipeline. 
Has anyone else noted how ridiculous the concept of a button-back blouse is??
My arms go forward people!

LYLT,

Emmie x

The Oz Dress - Elisalex FBA complete!

Sunday, 15 September 2013


Hi Guys!

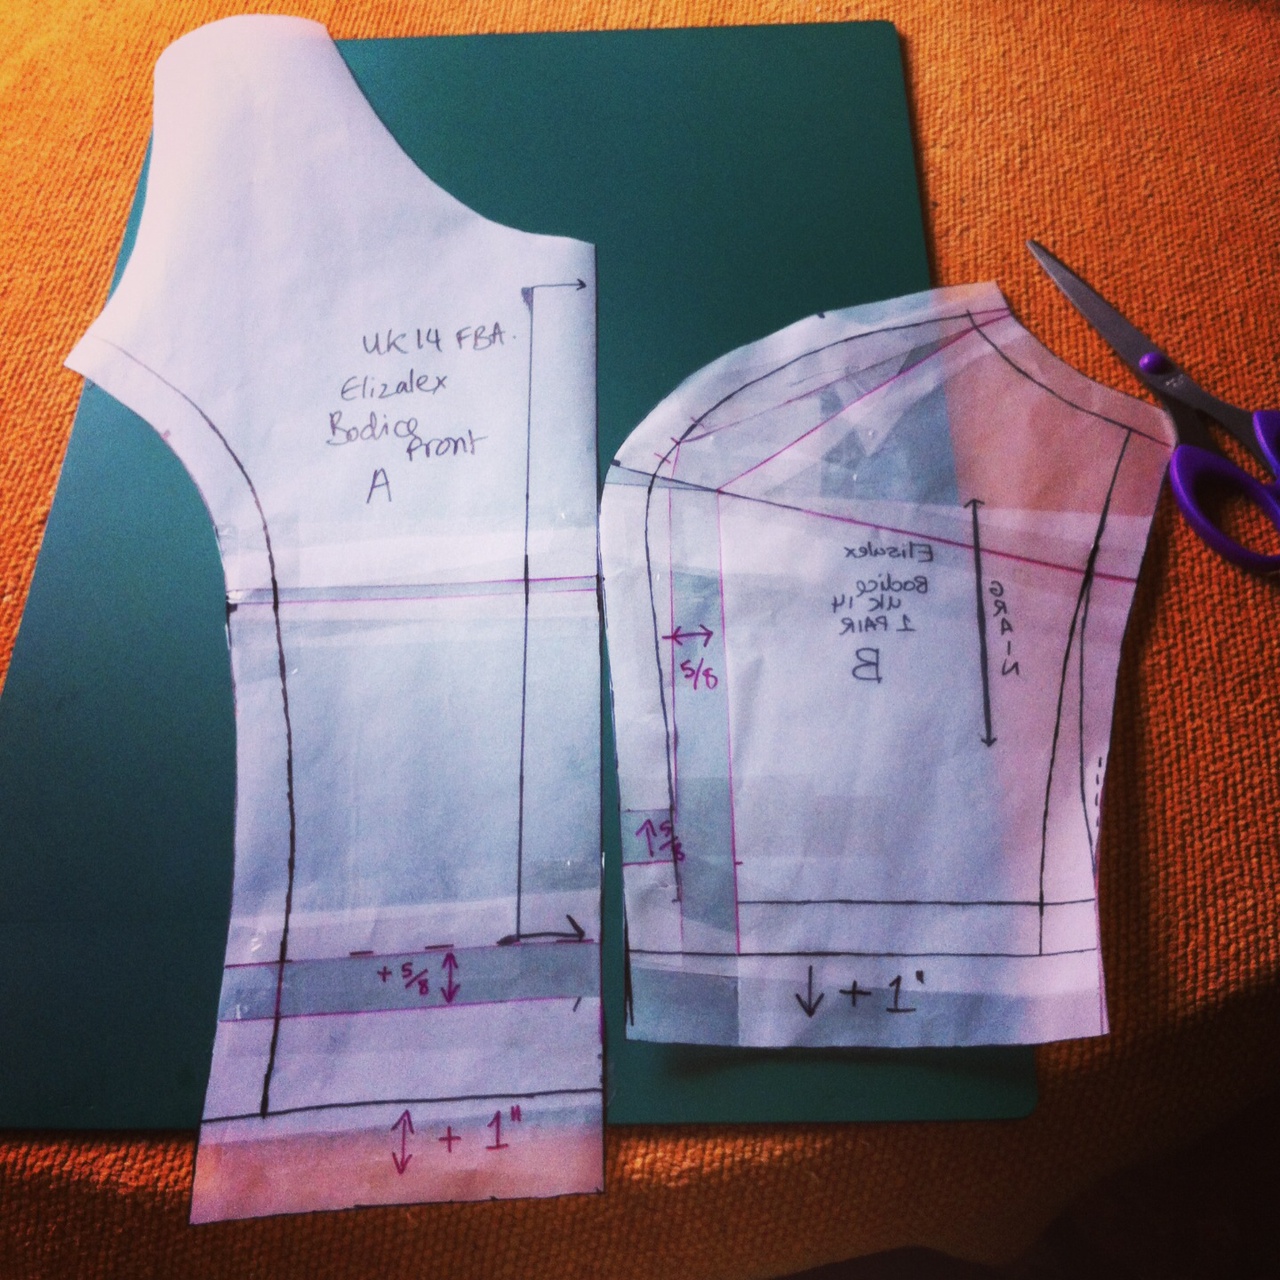
I finally (FINALLY) finished my attempt at an Elisalex bodice with a full bust adjustment.
It's been a long time coming, as there were a few delays along the way, but I did post some progress pictures along the way on Instagram and Twitter.


I knew I definitely needed to adjust the bodice when I finished my last Elisalex.
 It fit, but it didn't fit the way it should! I definitely had the "Squished VonBoobies" look. I followed the FBA instructions written up by Elisalex (and by this point I actually understood them!), and did a 5/8" FBA, with another inch added to the bodice length (although next time I think I'll do 1.5"). I think I gave myself a tiny bit extra in the bust than my measurement just for comfort.

But with this comparison photo, even with the bodice just pinned together you can definitely see the improvement! Much more room, and the girls are much perkier, I'm sure you'll agree! The fabric is a blue Gingham (probably polycotton) I got at a market in Rye.


So what happened next was Delay 1. Which I think was pre-washing my lining. But that was easily fixed once I actually put it in the washing machine. Clever, eh?

Once I had the bodice lined I had to attach the gathered skirt FROM HELL.
I put the whole thing together, and then found loads of bits of the skirt that had caught up into the seam. 
Argh!
Then, upon rectifying each individual bit, I managed to catch other different bits. And upon fixing those I caught other bits. By the time I finished the skirt, with no bits caught up I was fit to go into the garden and set the whole thing alight.

And so Delay 2 happened. Wherein the half-finished dress sat on my dressform for weeks. I did at some point manage to cut out some lining to line the skirt, as I realised it was indecently see-through.

Then it sat there for another while, until I decided to bite the bullet and put the zip in. And I even took the time to hand-baste it first, although really it doesn't take that long at all!

And then yesterday I decided to knuckle down and get it finished before I died of old age.

And to be honest I actually love the stupid thing.


And I'm using my fancy new tripod that Mr.G bought me. It's super cool and I got to use my wireless remote! I used most of the width of the fabric for the skirt and I managed to somehow get the length I had wanted all along! The bodice length does actually look and feel good, but I think I only did a 1cm seam on the bodice/skirt as I knew I needed all the length I could get. Still might add a little more next time so I can do a full seam allowance.


Since taking this picture, I have realised how much lower my right shoulder is.
And this was me trying to not look so wonky! Although I feel stupid saying that with my wonky crossed legs.


I really can't believe how perfect the fit is. I'm definitely gonna be using these pieces as my Princess Seam Block now, and playing with neckline and back variations. But I doubt I will be doing another gathered skirt anytime soon.

I am, however, pretty happy with the skirt in general. It doesn't make me look AS big as I thought it might. I do look quite hip-py, although most of that is actually hip. My hips pop out almost straight after my waist.

The stitching on the hem wasn't my best, as I was more focused on (a) trying to get all the white stitching in the white line of boxes and (b) trying to keep the edge of the skirt a blue box. But at least I managed those two things!


I do however think my next couple of makes are not going to be fully lined, as I want a few nice quick makes! But it does look good. And it was definitely necessary for this fabric. I do however want to escape to the land of folded hems and bias bound hems for a bit. I'll avoid facing-land if I can.


The dress kind of makes me feel like a cross between Dorothy (Damn should've worn my red heels!) and a ballet dancer. And I secretly used to prance around when I was younger (until not that much younger), pretending I was one. So, for your pleasure, some ballet style posing :)


And that's it! I wore it to dinner last night, and it was lovely and comfortable, so I know it will get plenty of wear! Although it may have to wait until the weather is nicer...

I'll leave you with a final pic of me with my regular grumpy.resting.face


LYLT,

Emmie x


More Vintage Goodies!! (Warning - Patterns!)

Saturday, 31 August 2013


Hi guys,

I know what you're thinking. Emmie, stop buying shit, and sew something. Also, don't you already have a shed-load of patterns? When are you going to get around to sewing the ones you already have...

Or maybe you're not thinking that, because you guys are like me! 
But I'm sure that's what Mr.G is thinking. 

I swear I have been! I have a couple of UFO's hanging around that I need to get to finishing. 
I'm not that bad at putting in zips, so I don't know why I avoid them for so long. I would do it today, as Mr.G is off playing golf, but I've been invited for a wine & cheese afternoon. 
I thought it was an evening, but no, it's starting at about 2pm!

But I digress, you came here for Goodies... scroll on for the parade of dresses (with a couple of blouses thrown in for good measure)


And how did these fall into my lap. Well Laurie from Sew Exhausted bought her own parade, and when I stole a glance at Vintage Martini I was sold. Prices are so good, and when you have you're own personal enabler, what other way could the story end. Thanks again Laurie, I love them all!!

And further to that, I had my lovely Mammy visiting me, and when I took her to my favourite little vintage shop, I ended up coming home with some lovely cast iron Iron's (to use as pattern weights)....


And a lovely cantilever sewing box :)


This month I have also acquired some new scissors, which were cheap and appear to be nice and sharp! And a couple of rotary cutters. That's all, I swear. That's all I can remember anyways.

Just a little side note for all you out there who struggle to store their patterns... I spotted the most perfect little storage boxes in Wilkinsons today (although I forgot to go back and get them). I think they were these ones. The picture shows them from the side, but they are the right width for standard sized patterns I think (I have no idea what I am going to do with the large sized repro-vintage Vogue ones).

LYLT,

Emmie xx


In love with FASHIONARY...

Thursday, 25 July 2013

Hi Guys,

Sorry if you're sick of the sight of me, but this is my my sewcation and I'm feeling inspired!

Today, don't worry I haven't a new make, but I have got a new book that I want to show and tell!

And so I present to you - FASHIONARY


Some of you might have come across these awesome books before. 
For those who don't know, the name 'FASHIONARY' comes from 'Fashion + Dictionary + Diary'. 
FASHIONARY is a sort of Fashion Design Dictionary, Diary, and sketch enabler.

I have decided recently that I want to start learning the art of pattern cutting, and remembered how I used to have a sketchbook as a young teen, where I would sketch clothes whenever I got inspiration. 
I thought this would be a good idea for the present, so that I could try to get my creative juices going again.

Then I remembered that I had come across FASHIONARY a long time ago, and was very tempted to buy one. 
And so I decided it was about time to bite the bullet and do it. 

In the A5 book, the first 34 pages are the Dictionary. 
They are filled with all sorts of things from a Brand Index, to a Bibliography of Fashion and Sewing books, to a Body Measurement section, to Fabric Information & Seams and Stitches.


The remaining 130 pages are the Diary.
On these 130 pages, the 'Diary' has 400 barely visible figure templates (3 per page), to enable faster and more consistent fashion sketching. They are formed of dots, and are barely visible, so you can use the pages as regular pages also, if you like.
Difficult to get a good photo of!


It's really a very inspiring notebook. 

I chose the A5 instead of the A4, as there are only 3 figures per page in both sizes, and you get more figures overall in the A5 size (400 vs 280). I guess it depends on how much detail you want to include on your drawings. Also, its the perfect size for sticking in your bag, for when inspiration strikes.

They do have other memo pads and things you can buy too, and you can download a free pdf of the templates to give them a go. Pretty generous in my estimation.

To see the notebooks in amazing action, check out http://fashionary.org/poll/
I can't believe the detail, and the difference in all of the sketches.

The website is American, but I bought mine from Amazon for about £16.
I know, a bit pricey for a notebook, but sometimes you need to pay for beautiful things.
You can buy them direct with free shipping, but the Amazon price is actually almost the correct conversion.

I'll leave you with some of the book specs!

Emmie xx


(disclamer : I bought this notebook with my own, hard-earned, funds and this is an independent and 
un-biased review)


Made With Love By The Dutch Lady Designs