Showing posts with label full bust adjustment. Show all posts

First Minerva Crafts make!

Thursday, 7 November 2013


Hi guys!

I've been super excited to show you my first Minerva Crafts Network make - and here it is!


I eased myself in gently this month, with a Mae top by BlueGingerDoll. Granted when I decided to have this as my first make, I hadn't made it at all. Maybe I shouldn't have blogged the green one first... Oh well.

I couldn't help myself - I craved a creamy white one. It might be something to do with the fact that I have over 50 skirts, and only 2 tops that I like! You'll also see why I couldn't resist ordering this particular kit when I turn around.

The fabric I ordered to make the top is the Linen-Look Cotton, previously used by Kathryn and Anna. I thought it looked beautiful, and it had the shade of cream I was looking for. And I thought the texture would give interest to an otherwise simple top.


I love the fabric; it feels lovely against my skin, has an interesting linen texture and washes and presses really well. One of the only issues I've found about this shade is that it was somewhat more sheer than I expected. I was almost finished when I decided to check how opaque it was, but I didn't feel that a lining would've suited this top as it would add too much bulk to the lines, especially at the darts. In the future I would consider underlining this fabric colour - and I can give it a go as I seem to have half of my kit left! I think I squeezed this out of little over a metre of fabric! Thats 58" wide fabric for you.


 As I was quite a ways into the make, I decided to make some slight adjustments to make it work as it was. As the intended neck and shoulder facings for this top are quite wide, they could be seen through the top. I didn't like how it looked, so I trimmed them down to about 5/8", and I slip stitched them down. To be honest, I might actually do this again in the future, as facings drive me cracked! It just ends up looking a bit like a bias bound edge. Or, you know, you could just have a bias-bound edge (But who wants to make bias-binding? I need a bias-binding fairy).

The only other issue I encountered with this make, was the method by which I transferred my pattern markings. I'm a fan of carbon tracing paper for transferring pattern markings and tailors chalk or fabric pencils for buttonholes. They weren't visible through the fabric when I transferred them, but I could see them when I got around to pressing it properly. And the chalk tinted the cream thread in the buttonholes!
I rubbed in some intense stain treating detergent and gave it a good wash and it almost all came out, thank god! But I would definitely think of going down the tailors-tack route, or you know, using yellow carbon instead of blue next time! Only I would use blue!


You can definitely see the colour of my trousers coming through the top, but I will definitely be able to get away with wearing a nude bra and a high-waisted skirt. And hello?? I'm wearing trousers?? Who can say they've seen that before?? I just really want to show you guys the full line of the top this time.

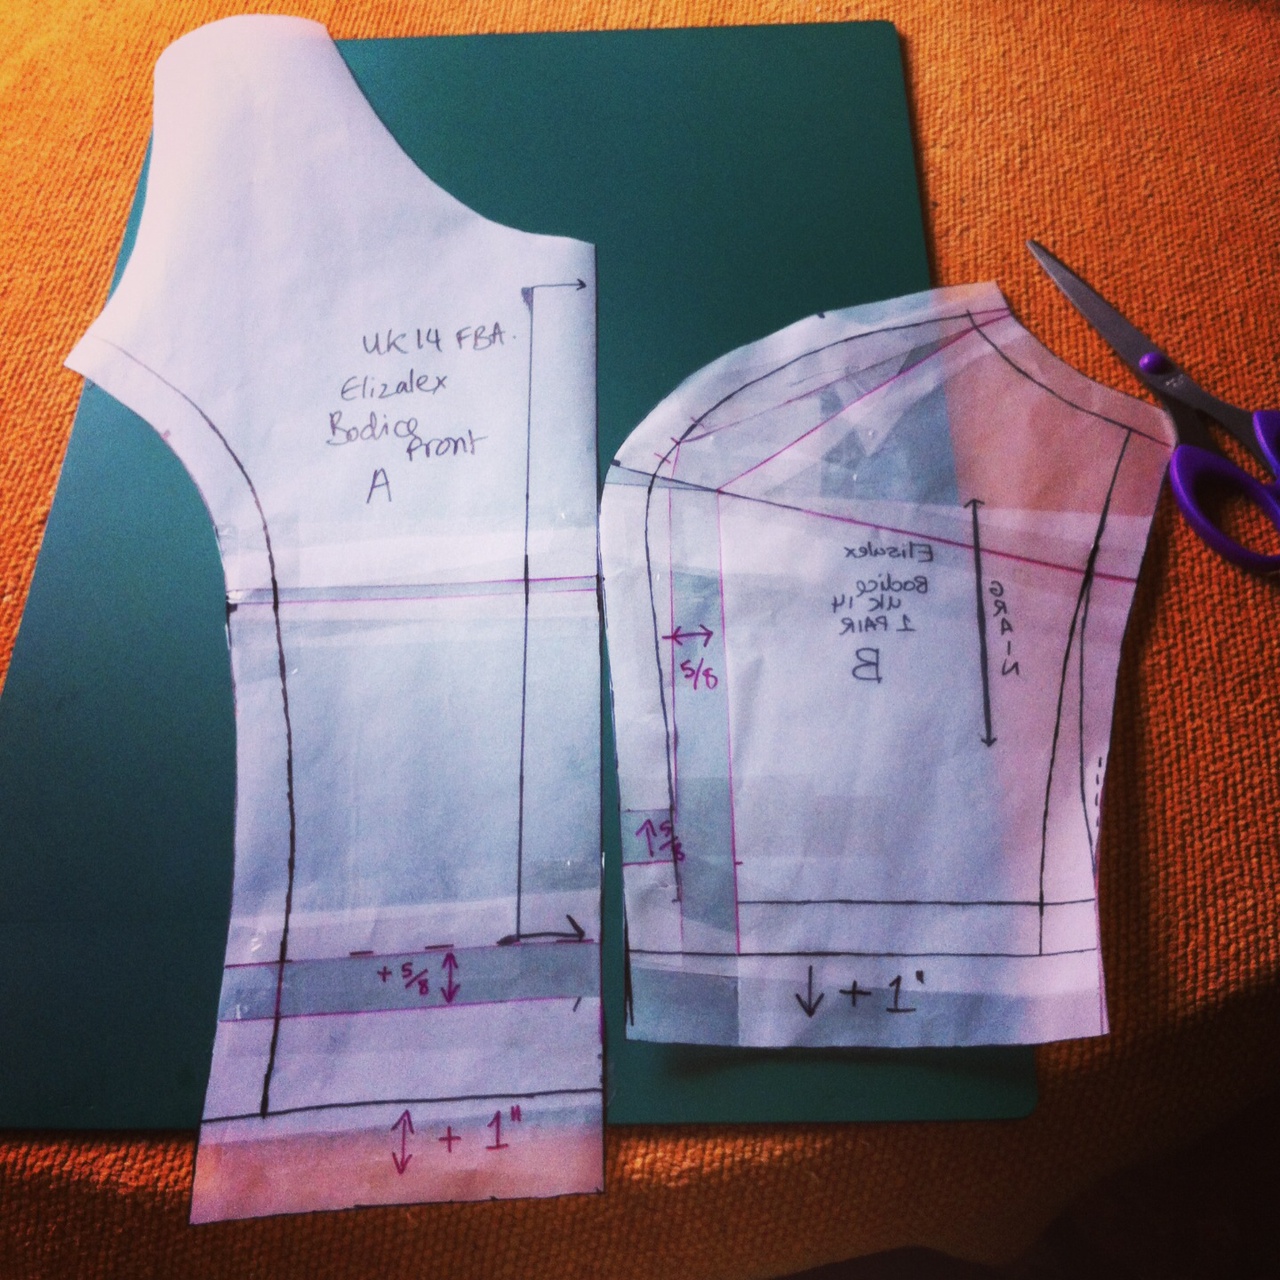
You can read about all of my other pattern adjustments in my previous blog post here. The only thing I changed this time was to take in the hips slightly - the pouffyness was hidden under the skirt in the pictures last time. I overlocked all of the insides, and finished as many edges as I could before I started putting the pieces of fabric together.


I made the decision to make this blouse when I found these buttons. Are they not the cutest thing you've ever seen?? There are a few variations, but these were my favouite... Little Art Deco ladies. Amazing.


Changes for next time? I think I will interface the back button plackets, and I think I may topstitch the placket too. Just to give it a bit more strength and stability. Plus I like how it looks!

So, I hope you like it! You can buy the kit for my make here. You get 2 metres of the cotton (enough for any mistake!), interfacing, 7 of the beautiful buttons, and matching thread. Who doesn't love not having to go and find matching thread? I don't know anyone who would turn that down!

LYLT,

Emmie xx

Late night sewing... Mae Blouse - Bluegingerdoll

Saturday, 12 October 2013


Hi Guys,

I finished the third attempt at my Mae blouse! Yes THIRD.
Let me take you on a journey...

The first attempt was with sewable tracing paper. 
I traced between the size that suited my "finished garment" measurements and the next size up, but it wouldn't even close. This surprised me, as I know the patterns are drafted for a D (I know I'm an E but I thought I was gonna be pretty close, I was wrong). I definitely needed some bust adjusting, I wasn't even been able to close it! 


So I decided to follow the sewalong, and do an FBA.
However it went a bit weird in the middle. Let me explain why.

In the sewalong, the first thing you do for an FBA is cut off the sleevey bit. Then you do the FBA and stick the shoulder back on.

Weirdness 1: In the sewalong (illustrated) pictures, it shows a straight edge where you trimmed off the sleeve, even after the FBA. But when you do an FBA you create a side Dart and it ends up kicking out at the side, it doesn't end up straight. I didn't know what to do so i just overlapped the sleeve over the kicked out bit and continued on

Weirdness 2: The side dart created is never mentioned again. I was at a loss as to whether to ignore its existence or sew it up. I thought it would be be baggy and weird if I ignored it, so I sewed it up and trued up the waist/hips. Although I kind of made a balls of measuring them (I forgot to remove the front darts when measuring)

Muslin 2 was done in a lilac cotton sateen lining, that I thought could possibly be wearable, until I cut too short a piece of fabric (although it was still workable) Then I realised that it had a really loose weave (pins were leaving massive holes) and that it was pulling like hell. No No No.

After sewing that up, it closed, but it was SNUG. And getting something to just close is not something to aim for! It was drag-line city.

So I halved the seam allowance and tried again. Close but no cigar.
I drew a whole new seam allowance on the pattern for the next try.

So that brings us to Muslin 3! I made it with something I got at a stash swap. (Thanks to whoever donated!). Not sure what it is, a slub silk or a wannabe slub silk. Either way, its a little stiff, so bear with me in terms of how it crumples instead of drapes. Part of the issue is that my skirt has a smaller waist than the blouse! It looks a lot shinier in these photos too... 

Now in photo one, I am becoming one with the fabric in terms of stiffness. What is with the arms? I look like a puppet on a string. However, let us admire the fact that I found something to match it in my wardrobe! A kilt I got in the Salvation Army. Talk about a 'Fall' Wardrobe, eh?


Although in this photo, I think it looks a little big, it looks better shortly!
I am pretty proud of my finishing. I surprised myself with the scalloped neckline, I thought that was going to be a lot harder. It turned out a lot better than I thought, although Thank God it did because any flaws would be really obvious in this fabric. I used my new overlocker (although it was threaded white, so the insides look a little silly) but I did hand catchstitch all of the hem and sleeve facings! And partially thanks to the stiffness, partially my mad 1.00am sewing skills and partially Mr.G's thread matching capabilities, I think its pretty damn good.


It's like the 1.00am sewing never happened... 
I haven't done the neckline facing. Yet. I'm still not sure if I want to, in case it's too obvious.

In a side note, you can see my crazy eye colour in that top photo!


After the first few photo's, I decided to loosen up and stop looking like such a grump grump.
However, apparently I must raise one eyebrow at all times.


One modification I made to the back was to do the buttonholes vertical instead on horizontal, as I didn't like  the thought of how the buttons would drag off to one side instead of being central in the buttonhole.


I wish that the skirt waist wasn't so snug! Crumple crumple.

I would like to take this opportunity to categorically state that I sewed the buttons on straight and tight, but the buggers prefer to look tipsy, no matter how much I twiddle them. They are vintage buttons that I bought in a vintage shop in Rochester. Thanks for the recommendation Rachel!

All in all I found the pattern pretty straight forward, although I would definitely follow the sewalong, as I found the written/illustrated instructions hard to follow. 
It's probably just how my brain works, but I was stumped in a few places. The hem boggled me so I winged it in the end. I didn't end up doing the second turn either. Ironically I think I understand now, in this exact moment. The photo was the wrong way up for my brain.

But look, I'm still happy with how it turned out! Even my eyebrow agrees


Another version is already in the pipeline. 
Has anyone else noted how ridiculous the concept of a button-back blouse is??
My arms go forward people!

LYLT,

Emmie x

Selfless sewing - Deer & Doe Chardon .... and a few surprises!

Sunday, 6 October 2013


Hi guys,

Long time no hear? (Is that an Irishism btw? I'm still having to check certain phrases, even after 4 years)

SO.. I haven't posted in a while, but I have been tipping away (now that's definitely an Irishism?).


aNYwho - 

So I have been sewing, trying to muslin out a Mae blouse at the moment, and I've been having a few issues - 

Mainly the first one was too small. The back barely touched, and clearly as its a button placket, its supposed to overlap!
I was surprised as I did go by the measurements, and even traced between sizes for some ease. 
I have done an FBA and some other random tweaking (mainly more letting out) so I should be good to go soon. I've just cut out the 3rd (hopefully wearable) muslin. Mr.G left me alone last night to get it all sewn up, but on a phone call to my Mam she asked me about the skirt that I was supposed to be making my sister, and I realised that it was sitting in a box, just waiting to interface the facings.

And after Kathryn's Sewing Enjoyment chart, I've realised my 0% is interfacing stuff. 
Why - I don't know..

But I decided to get my shit together and suck it up, and I've just finished off the whole thing.
Boo yea!


As the title said, its a Deer & Doe Chardon skirt. I'm actually very proud of the darn thing! It looks great, and I'm really excited to give it to my sister.
I can't model it for you myself, as she has a smaller waist, so I'll have to let the dressform do the honours.


Pattern-wise, it came together really quick. I used a tropical print, medium weight, stretch cotton from A1 on Goldhawk Rd. It was one of the 5 meter lengths that Janene and Roisin split in the past. 
I, however, am selfish and if 5 meters are there then they're all mine!! Mwa- ha ha.
Thankfully, I have still got more than enough of this to make myself a dress too :)


The fabric is weighty enough to give the pleats a proper pop, and stand off the body.
I did find it came up a bit big (although maybe the fabric stretched?) so I trimmed it down.
I'm a bit nervous that I was a bit trim happy so hopefully it fits! I also shortened it a fair bit, as my sister is one for the short skirt (occasionally indecent). I think for her this is a very modest, demure length.


The fabric is a bit thick in terms of folding down the facings and getting them to sit down, and again in terms of zipping up at the facing area. This was a combination of the fabric, but also all the pleats. Although my zipper insertion was very clean! I topstitched along the top to keep the facing down inside.

I did intend on doing the back bow but I forgot to do it before I sewed up that pleat, and then I wasn't arsed going back to put it in! I wasn't sure about it anyway because I only had the same print, and the fact the fabric is so thick, I wasn't sure it would tie well. No matter.

One thing I ADORE about this pattern is the pockets! Granted they are my first pockets, so I'm pretty excited about them, but they are lovely and deep, and are the perfect hand-size - wrist deep! They feel so good. and they are really well hidden in the pleats. They will be my go to pocket pattern piece from now on.


And I must say, one of the reasons it came together so fast and so clean, was because of this baby...


Surprise!! I got an overlocker yesterday!!!

Its a Janome 9200d, and I must say I am IN LOVE

Now, I didn't expect to be... Mr.G was going to get me one for Christmas, and I wasn't even excited.
I was a bit shruggy about it. A bit 'Meh'.
I kept saying - "I don't really neeeed one".

But dear god things have changed. The insides of this skirt look serious.


Now, the surprise is the overlocker, and the story of how the stork brought my baby to me.

Well - 

I was walking through town last week, and was thinking about how I would love to befriend a tailor/dressmaker to teach me the ways of the needle, and as I was passing a small tailors that I usually just stroll past, I looked in the window, and I saw that he was selling mannequins for £20. Mr.G noticed a few other things for sale, and we wondered if perhaps he was closing.

I passed again today, and noticed other things for sale. And hanging up there was a Harris Tweed men's Jacket for £45. Bearing in mind that the last Harris jacket I saw was £250, I couldn't help having a look.
It was a 40" chest, so I thought I could definitely take it all apart and cut each piece in a more me size.. perhaps? It didn't have much detailing as it stood, so the pieces weren't distorted.

It looks vintage (the lining has that look), so I decided to go for it.


I have pictures of the expensive jackets I was inspired by.


As I had forgot my purse, Mr.G had to go to the cash machine.

In the meantime, me and the Tailor-man got to talking about dressmaking and he asked me if I had an overlocker. He then proceeded to tell me he was intending on selling his 6-9 month one due to closing down.
And then he said he would sell it for £70.
BARGAIN!

I was sold, and Mr.G had to go to the cash machine again. He also did a quick google search and it came up at £200-250. On top of that, I bought a big tin of buttons for £5. He said there were some Horn buttons in there (but I'm no button connoisseur).


 And he gave me a sleeve board (as he had 3!). I just have to pad and cover it, but he showed me how he did his. It pretty big. I may have to get a smaller one for slim sleeves! but it will be good for wider sleeves and trouser legs. Or maybe it will be ok, I haven't done many sleeves so far.


It was so cool. And there's more that I'm going to buy off him...
But I'll talk about that when I get them.

Some stuff he's ready to part with (but I had enough to carry for one day, and I couldn't send Mr.G to the cash machine for a third time!) And other things he's gonna wait until he's closing the doors. There's a couple bits of fabric I have my eye on!

I also want to take pictures of his industrial machine ( I think he said approx 5200 stitches a minute - that is mind-boggling) and an industrial overlocker (the reason he had the Janome was because it takes about 2hrs to change a thread colour!). And also, an industrial steam iron (which you have to fill with 5 pints of water in the morning! Something like 40psi of steam).

It's only a small shop but it was cool to see thing's I'd never seen before.
I'll have to wait and see what his price will be for a few of the bits - I'm gonna put a clamp on my bank account for the minute!

To be continued, eh?

Do you think that I will be able to refashion the Jacket???

LYLT, 

Emmie x

The Oz Dress - Elisalex FBA complete!

Sunday, 15 September 2013


Hi Guys!

I finally (FINALLY) finished my attempt at an Elisalex bodice with a full bust adjustment.
It's been a long time coming, as there were a few delays along the way, but I did post some progress pictures along the way on Instagram and Twitter.


I knew I definitely needed to adjust the bodice when I finished my last Elisalex.
 It fit, but it didn't fit the way it should! I definitely had the "Squished VonBoobies" look. I followed the FBA instructions written up by Elisalex (and by this point I actually understood them!), and did a 5/8" FBA, with another inch added to the bodice length (although next time I think I'll do 1.5"). I think I gave myself a tiny bit extra in the bust than my measurement just for comfort.

But with this comparison photo, even with the bodice just pinned together you can definitely see the improvement! Much more room, and the girls are much perkier, I'm sure you'll agree! The fabric is a blue Gingham (probably polycotton) I got at a market in Rye.


So what happened next was Delay 1. Which I think was pre-washing my lining. But that was easily fixed once I actually put it in the washing machine. Clever, eh?

Once I had the bodice lined I had to attach the gathered skirt FROM HELL.
I put the whole thing together, and then found loads of bits of the skirt that had caught up into the seam. 
Argh!
Then, upon rectifying each individual bit, I managed to catch other different bits. And upon fixing those I caught other bits. By the time I finished the skirt, with no bits caught up I was fit to go into the garden and set the whole thing alight.

And so Delay 2 happened. Wherein the half-finished dress sat on my dressform for weeks. I did at some point manage to cut out some lining to line the skirt, as I realised it was indecently see-through.

Then it sat there for another while, until I decided to bite the bullet and put the zip in. And I even took the time to hand-baste it first, although really it doesn't take that long at all!

And then yesterday I decided to knuckle down and get it finished before I died of old age.

And to be honest I actually love the stupid thing.


And I'm using my fancy new tripod that Mr.G bought me. It's super cool and I got to use my wireless remote! I used most of the width of the fabric for the skirt and I managed to somehow get the length I had wanted all along! The bodice length does actually look and feel good, but I think I only did a 1cm seam on the bodice/skirt as I knew I needed all the length I could get. Still might add a little more next time so I can do a full seam allowance.


Since taking this picture, I have realised how much lower my right shoulder is.
And this was me trying to not look so wonky! Although I feel stupid saying that with my wonky crossed legs.


I really can't believe how perfect the fit is. I'm definitely gonna be using these pieces as my Princess Seam Block now, and playing with neckline and back variations. But I doubt I will be doing another gathered skirt anytime soon.

I am, however, pretty happy with the skirt in general. It doesn't make me look AS big as I thought it might. I do look quite hip-py, although most of that is actually hip. My hips pop out almost straight after my waist.

The stitching on the hem wasn't my best, as I was more focused on (a) trying to get all the white stitching in the white line of boxes and (b) trying to keep the edge of the skirt a blue box. But at least I managed those two things!


I do however think my next couple of makes are not going to be fully lined, as I want a few nice quick makes! But it does look good. And it was definitely necessary for this fabric. I do however want to escape to the land of folded hems and bias bound hems for a bit. I'll avoid facing-land if I can.


The dress kind of makes me feel like a cross between Dorothy (Damn should've worn my red heels!) and a ballet dancer. And I secretly used to prance around when I was younger (until not that much younger), pretending I was one. So, for your pleasure, some ballet style posing :)


And that's it! I wore it to dinner last night, and it was lovely and comfortable, so I know it will get plenty of wear! Although it may have to wait until the weather is nicer...

I'll leave you with a final pic of me with my regular grumpy.resting.face


LYLT,

Emmie x


The Frankenstein-Dress (prologue)

Thursday, 6 June 2013

Just wanted to post a sneaky prologue of my new dress that I'm creating through another mash up of pattern pieces.

Am trying out my first Full Bust Adjustment! Here's a sneak peak at the adjustment on the right, and then a little trial of changing the darts on the left, as the massive horizontal dart with the vertical dart made for a square-ish boob!

An gonna work on it at the weekend.. If all goes amazingly well I might get to wear it to dinner at Goodwood House next weekend - or maybe to the Goodwood races :)

Exciting!


Made With Love By The Dutch Lady Designs